By: Team CS2103-AY1819S2-W16-2 Since: Mar 2019 Licence: MIT
- 1. Introduction
- 2. Quick Start
- 3. Features
- 3.1. Viewing help :
help - 3.2. Adding a contact :
add - 3.3. Listing all contacts :
list - 3.4. Selecting a contact :
select - 3.5. Displaying a sorted list of contacts by specified category :
sort[coming in v2.0] - 3.6. Searching for contact(s) by keyword(s) :
search - 3.7. Editing a contact :
edit - 3.8. Matching a contact to a property:
match[coming in v2.0] - 3.9. Deleting a contact :
delete - 3.10. Clearing all entries :
clear - 3.11. Pinning a contact :
pin - 3.12. Unpinning a contact :
unpin - 3.13. Selecting a pinned contact :
pinselect - 3.14. Archiving a contact :
archive - 3.15. Listing all archived contacts :
archivelist - 3.16. Selecting an archived contact :
archiveselect - 3.17. Searching for archived contact(s) :
archivesearch - 3.18. Unarchiving a contact :
unarchive - 3.19. Clearing all entries in archive:
archiveclear - 3.20. Listing previously entered commands :
history - 3.21. Undoing the previous command :
undo - 3.22. Redoing the previously undone command :
redo - 3.23. Exiting the app :
exit - 3.24. Displaying location on Google Maps™
- 3.25. Saving the data
- 3.26. Importing and exporting data with
.csvfiles[coming in v2.0] - 3.27. Encrypting data files
[coming in v2.0] - 3.28. Password-protected login
[coming in v2.0]
- 3.1. Viewing help :
- 4. FAQ
- 5. Command Summary
1. Introduction
The Real App is an enhanced Address Book designed primarily for real estate agents who need to store large number of client contacts as well as property information. You can store contact details for each of your specialised named clients, as well as essential information for the associated property. You can search for contact information using keywords. You can pin important contacts and even archive them when you no longer need them. Select your contact to display the location of the associated property on Google Maps™, so you know exactly where it is!
With these and many other features, The Real App is optimized for those who prefer to use a desktop app for managing contacts, and prefer to work with a Command Line Interface (CLI), while still having the benefits of a Graphical User Interface (GUI). If you can type fast, The Real App can help you manage all your contact and property information quickly and securely.
Interested? Jump to Section 2, “Quick Start” to get started. Enjoy!
2. Quick Start
Setting up the app
-
Ensure you have Java version
9or later installed in your Computer. -
Download the latest
therealapp.jarhere. -
Copy the file to the folder you want to use as the home folder for The Real App.
|
New files and folders will be generated after launching the app. You are recommended to move the jar file into a new empty folder. |
Starting the app
-
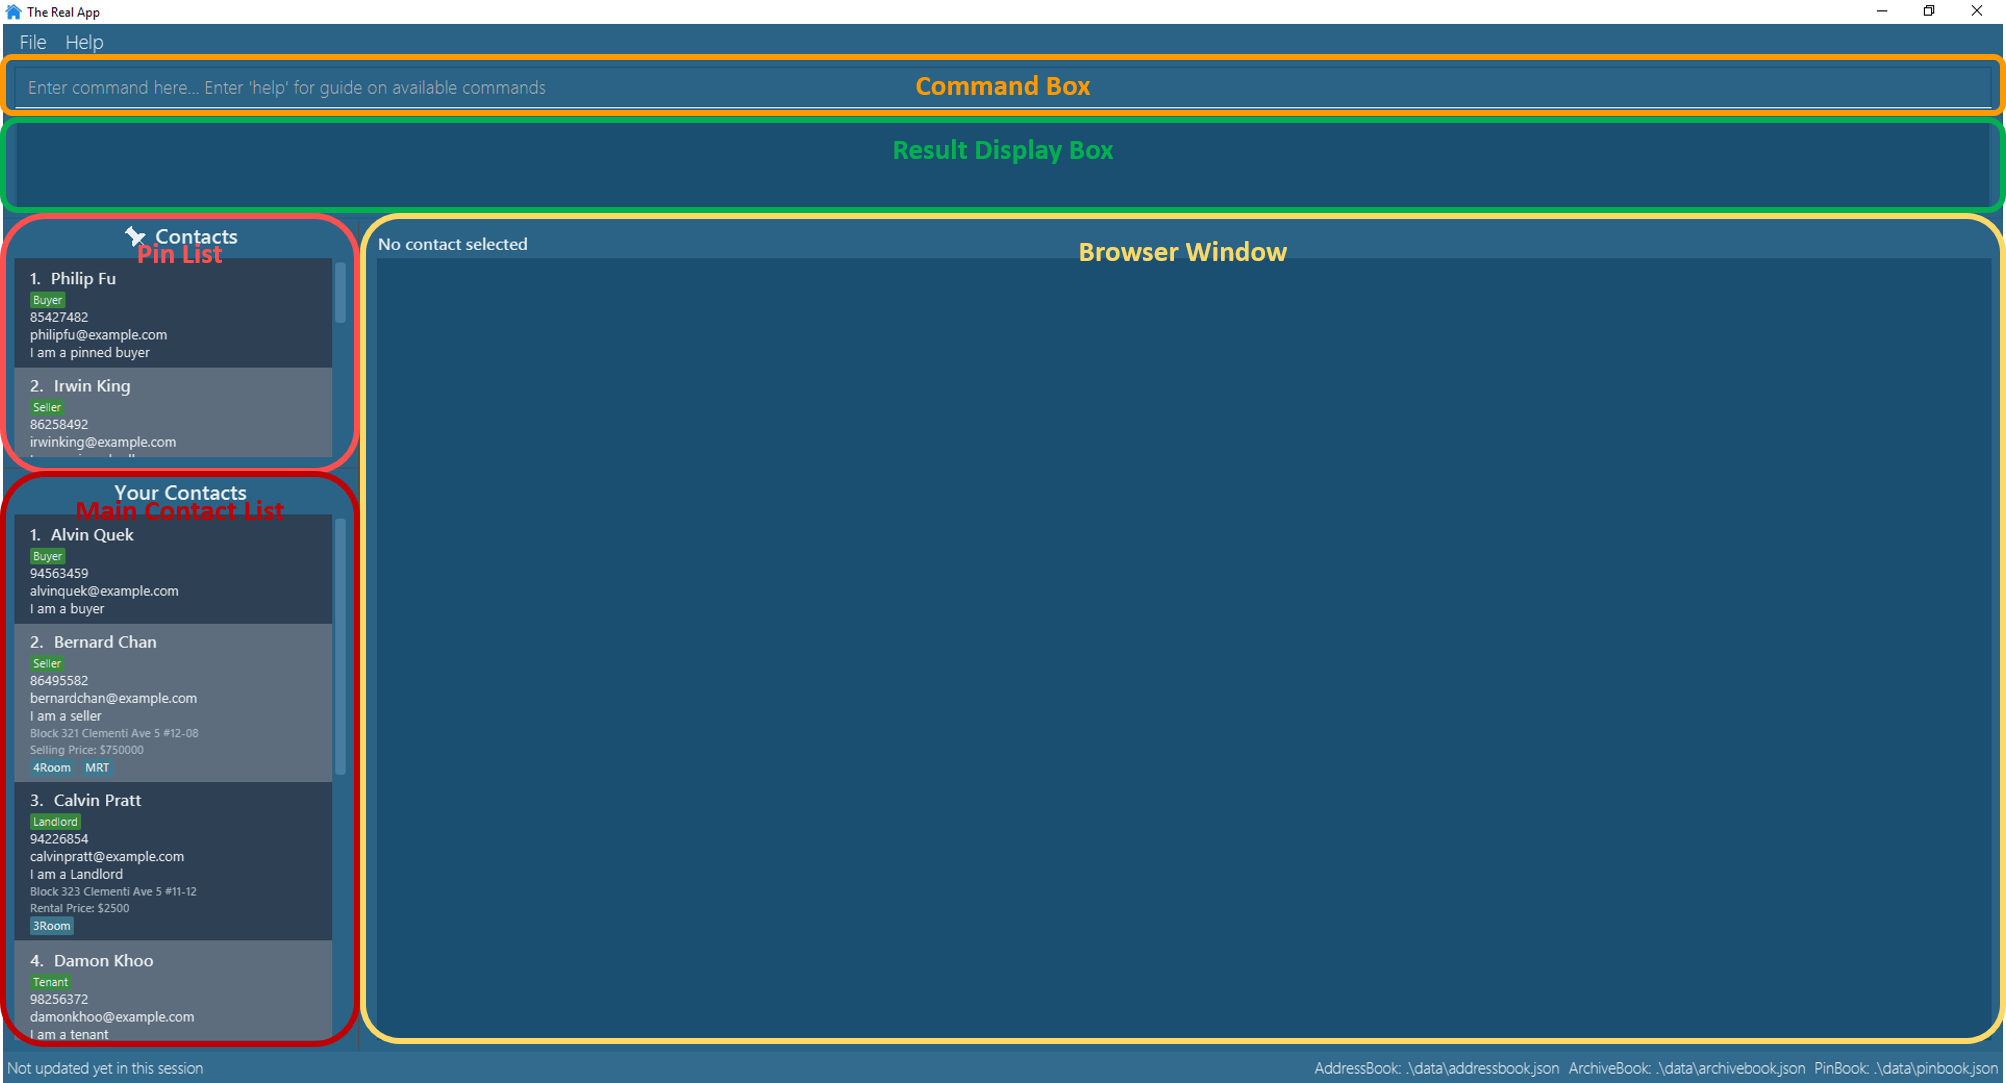
Double-click the file to start the app. The GUI should appear in a few seconds.
-
Type the command in the command box and press Enter to execute it.
E.g. typinghelpand pressing Enter will open the help window. -
The outcome of the command will be displayed in the result display box.
E.g. after successfully executing thehelpcommand, the following message will appear:
Opened help window.
Displaying main person list! -
The pin list shows the contacts who has been pinned. It can be resized by clicking and dragging the borders of the box.
-
The main contact list shows the active list of contacts. It can also be resized by clicking and dragging the borders of the box. You can toggle between the contact list view and the archive list view using commands
listandarchivelist. -
The browser window will display the property’s location on Google Maps™ when an appropriate contact is selected. You can go to Section 3.24, “Displaying location on Google Maps™” for more details of the Google Maps™ display.
Using the app
-
Here is an example workflow with some commands you can try:
-
addc/seller n/James Ho p/98765432 e/jamesho@example.com r/urgent need to sell a/Blk 345 Clementi Ave 5, #04-04, S120345 sp/500000 t/newlyRenovated: adds a seller namedJames Hoand the associated property information to the contact book. -
delete3: deletes the 3rd contact shown in the current main contact list -
searchclementi 4room: lists all contacts related toclementior4roomkeywords -
pin1: pins the 1st contact shown in the current main contact list -
archive2: archives the 2nd contact shown in the current main contact list -
archivelist: lists all archived contacts -
archivesearchlee: lists all archived contacts related toleekeyword -
list: lists all contacts in main contact list -
select1: selects the 1st contact shown in the current main contact list -
clear: clears the entire main contact list -
undo: undoes the previousclearcommand -
exit: exits the app
-
-
Refer to Section 3, “Features” for details of each command.
-
Refer to Section 5, “Command Summary” for a summary of all commands.
3. Features
Command Format
-
Words in
UPPER_CASEare the parameters to be supplied by the user e.g. inadd n/NAME,NAMEis a parameter which can be used asadd n/James Ho. -
Items in square brackets are optional e.g
a/ADDRESS [t/TAG]can be used asa/72 Clementi Road t/terraceor asa/72 Clementi Road. -
Items with
… after them can be used multiple times including zero times e.g.[t/TAG]…can be used ast/hdb,t/mrt t/hdbetc. -
Parameters can be in any order e.g. if the command specifies
n/NAME p/PHONE_NUMBER,p/PHONE_NUMBER n/NAMEis also acceptable.
3.1. Viewing help : help
Views a pop-up of the User Guide
Format: help
3.2. Adding a contact : add
Adds a contact to the contact book, with 4 variants of customer types. Adds the associated property information for sellers and landlords.
|
|
|
Accepted customer types: |
A property can have any number of TAG (including 0).
|
-
Seller:
Format:add c/seller n/NAME p/PHONE_NUMBER e/EMAIL r/REMARKS a/ADDRESS sp/SELLING_PRICE_OF_PROPERTY [t/TAG]…
Example:add c/seller n/James Tan p/97652456 e/jamestan@example.com r/need to sell by April 2018 a/Blk 345 Clementi Ave 5, #04-04, S120345 sp/500000 t/MRT t/newlyRenovated -
Buyer:
Format:add c/buyer n/NAME p/PHONE_NUMBER e/EMAIL r/REMARKS
Example:add c/buyer n/James Ho p/87657252 e/jamesho@example.com r/looking for 3-room apartment -
Landlord:
Format:add c/landlord n/NAME p/PHONE_NUMBER e/EMAIL r/REMARKS a/ADDRESS rp/RENTAL_PRICE_OF_PROPERTY [t/TAG]…
Example:add c/landlord n/Hans Tan p/90826522 e/hanstan@example.com r/family friend a/Blk 345 Woodlands Street 32, #04-04, S730345 rp/1500 t/MRT t/newlyRenovated -
Tenant:
Format:add c/tenant n/NAME p/PHONE_NUMBER e/EMAIL r/REMARKS
Example:add c/tenant n/Bo Yang p/86541526 e/boyang@example.com r/looking for 4-room apartment
|
When multiple parameters of the same type are entered, only the last one will be added. e.g. |
Screenshots for 1st example:
-
Enter
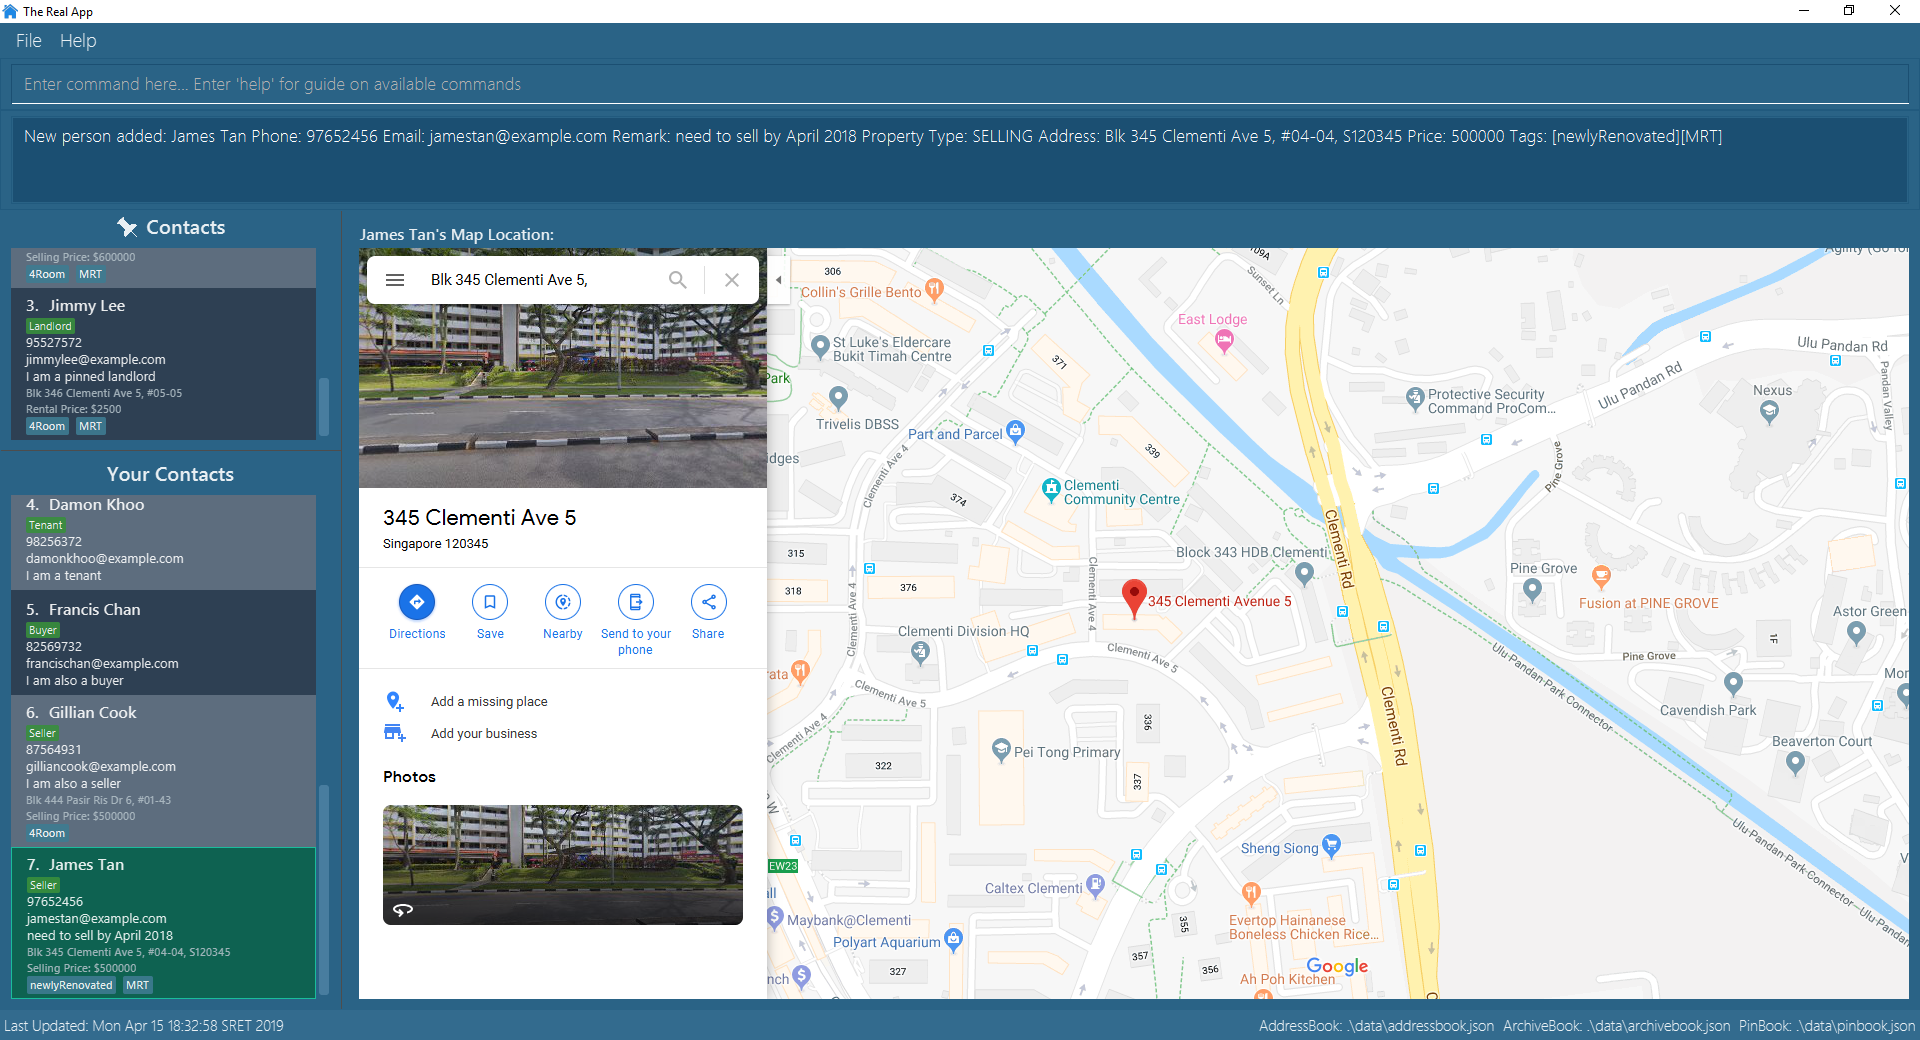
add c/seller n/James Tan p/97652456 e/jamestan@example.com r/need to sell by April 2018 a/Blk 345 Clementi Ave 5, #04-04, S120345 sp/500000 t/MRT t/newlyRenovated:

-
Client James Tan is successfully added, the contact list is updated and the newly added contact is selected:
3.3. Listing all contacts : list
Shows a list of all contacts in the contact book, in their added chronological order.
Format: list
3.4. Selecting a contact : select
Selects the contact identified by the index number used in the displayed contact list.
Format: select INDEX
|
Go to Section 3.24, “Displaying location on Google Maps™” for more details on the Google Maps™ display. |
Examples:
-
list
select 2
Selects the 2nd contact in the contact book. -
search James
select 1
Selects the 1st contact in the results of thesearchcommand. -
search seller
select 3
Selects the 3rd contact in the results of thesearchcommand.
3.5. Displaying a sorted list of contacts by specified category : sort [coming in v2.0]
Shows a list of all contacts in the contact book, sorted according to a specified category.
Format: sort CATEGORY [CATEGORY_RESTRICTOR] ORDER
|
|
Example: sort sp <540000 ascending
Displays the contact list sorted by price less than $540,000 in ascending order.
Example: sort n ascending
Displays the contact list sorted by name in ascending alphabetical order.
3.6. Searching for contact(s) by keyword(s) : search
Search for contact(s) whose information contains any of the keyword(s).
e.g. search by name, search by address, search by tags etc.
Format: search KEYWORD [KEYWORD]…
|
|
Examples:
-
search James
ReturnsJames TanandJames Ho -
search James Tan Yang
Returns any contact with information matchingJames,Tan, orYang -
search Woodlands Landlord
Returns any contact with information matchingWoodlandsorLandlord
Screenshots for 1st example:
-
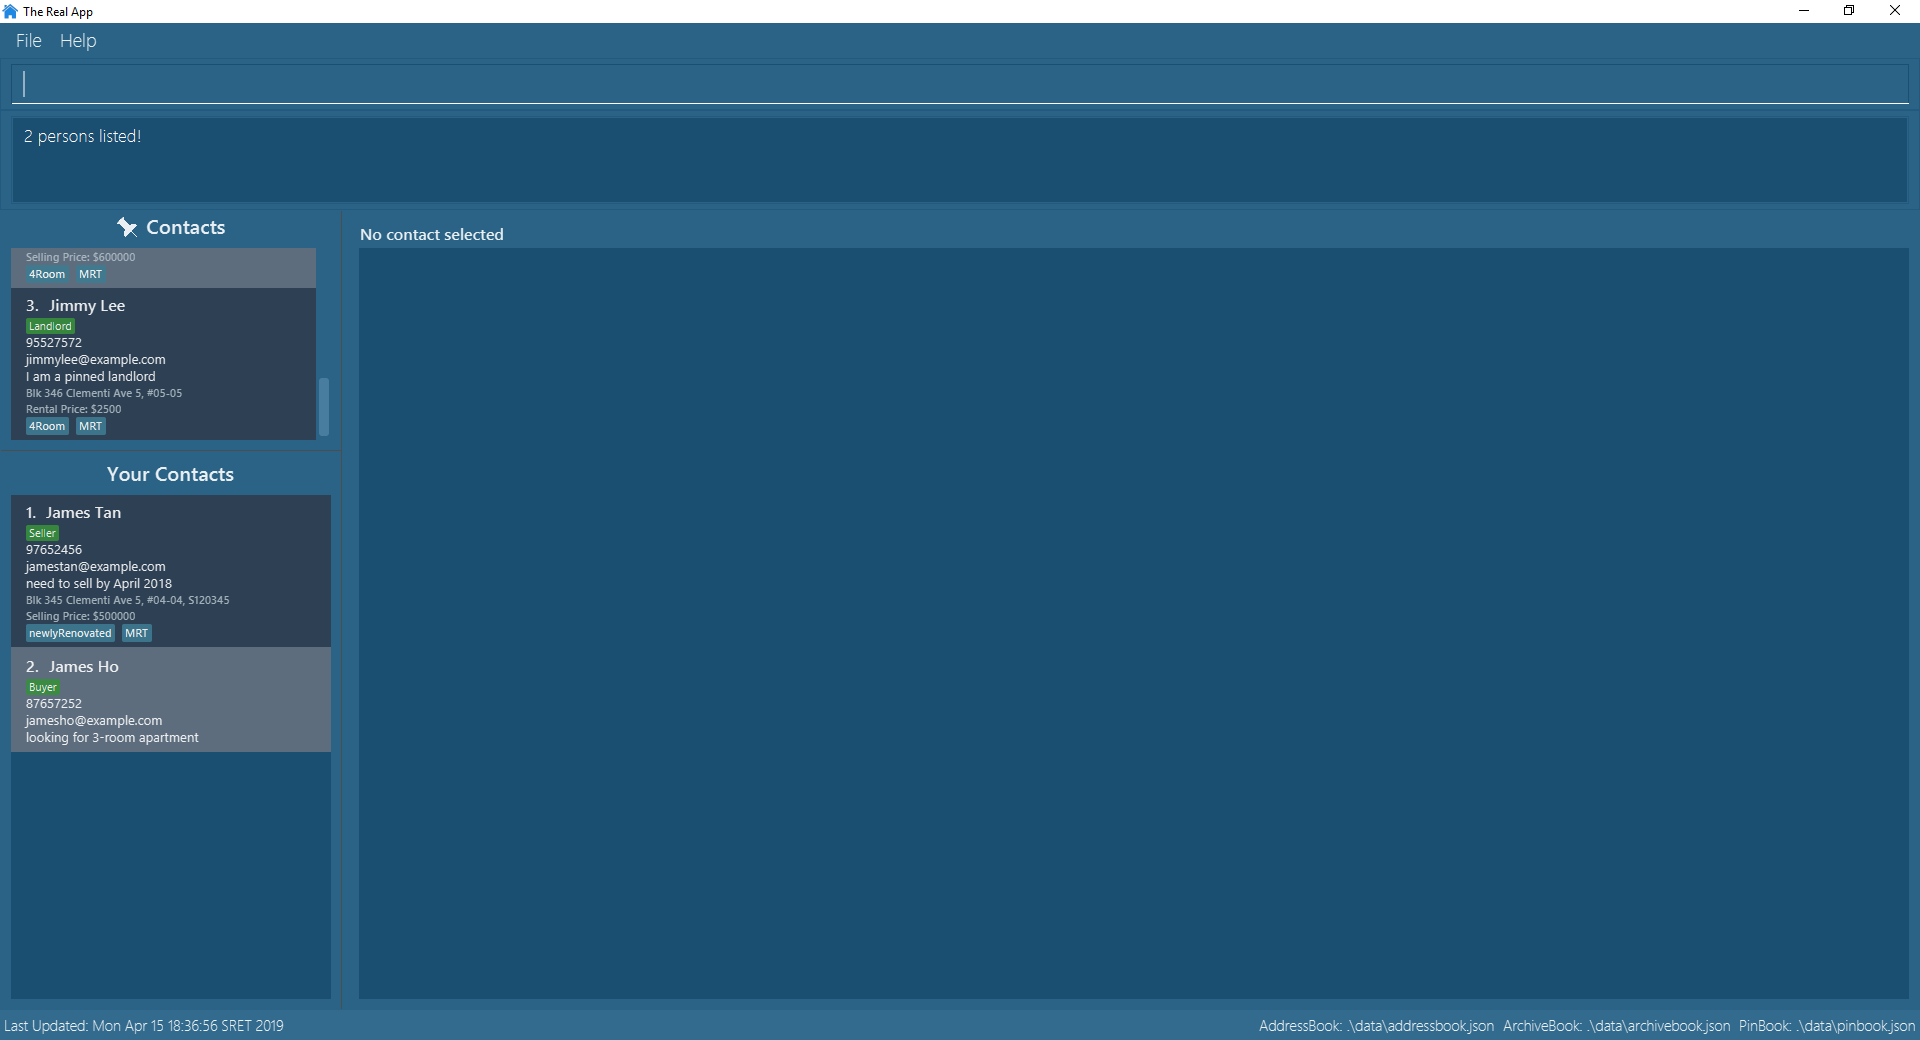
Enter
search James:

-
The search is executed successfully and the contact list is updated to show
James TanandJames Ho.
3.7. Editing a contact : edit
Edits an existing contact and/or associated property (if any) in the contact book, with 4 variants of customer types.
-
Seller:
Format:edit INDEX_SELLER [n/NAME] [p/PHONE_NUMBER] [e/EMAIL] [r/REMARKS] [a/ADDRESS] [sp/SELLING_PRICE_OF_PROPERTY] [t/TAG]…
Example:edit 2 n/James Li e/jamesli@example.com sp/450000 t/-
Edits the name and email address of the 2nd contact to be
James Liandjamesli@example.comrespectively. Edits selling price of the associated property to be450000and clears all existing tags.
-
-
Buyer:
Format:edit INDEX_BUYER [n/NAME] [p/PHONE_NUMBER] [e/EMAIL] [r/REMARKS]
Example:edit 2 n/James Han e/jameshan@example.com r/looking for houses in Woodlands-
Edits the name, email address and remarks of the 2nd contact to be
James Tan,jamestan@example.comandlooking for houses in Woodlandsrespectively.
-
-
Landlord:
Format:edit INDEX_LANDLORD [n/NAME] [p/PHONE_NUMBER] [e/EMAIL] [r/REMARKS] [a/ADDRESS] [rp/RENTAL_PRICE_OF_PROPERTY] [t/TAG]…
Example:edit 2 n/Jim Lee p/87654321 rp/1700 t/MRT t/Park-
Edits the name and phone number of the 2nd contact to be
Jim Leeand87654321respectively. Edits rental price of the associated property to be1700, clears all existing tags and adds new tagsMRTandPark.
-
-
Tenant:
Format:edit INDEX_TENANT [n/NAME] [p/PHONE_NUMBER] [e/EMAIL] [r/REMARKS]
Example:edit 2 n/James p/87654322-
Edits the name and phone number of the 2nd contact to be
Jamesand87654322respectively.
-
|
The customer type of the contact cannot be changed and only information type relevant to the customer type can be modified. |
|
When multiple parameters of the same type are entered, only the last one will be edited. e.g. |
Screenshots for 1st example:
-
Enter
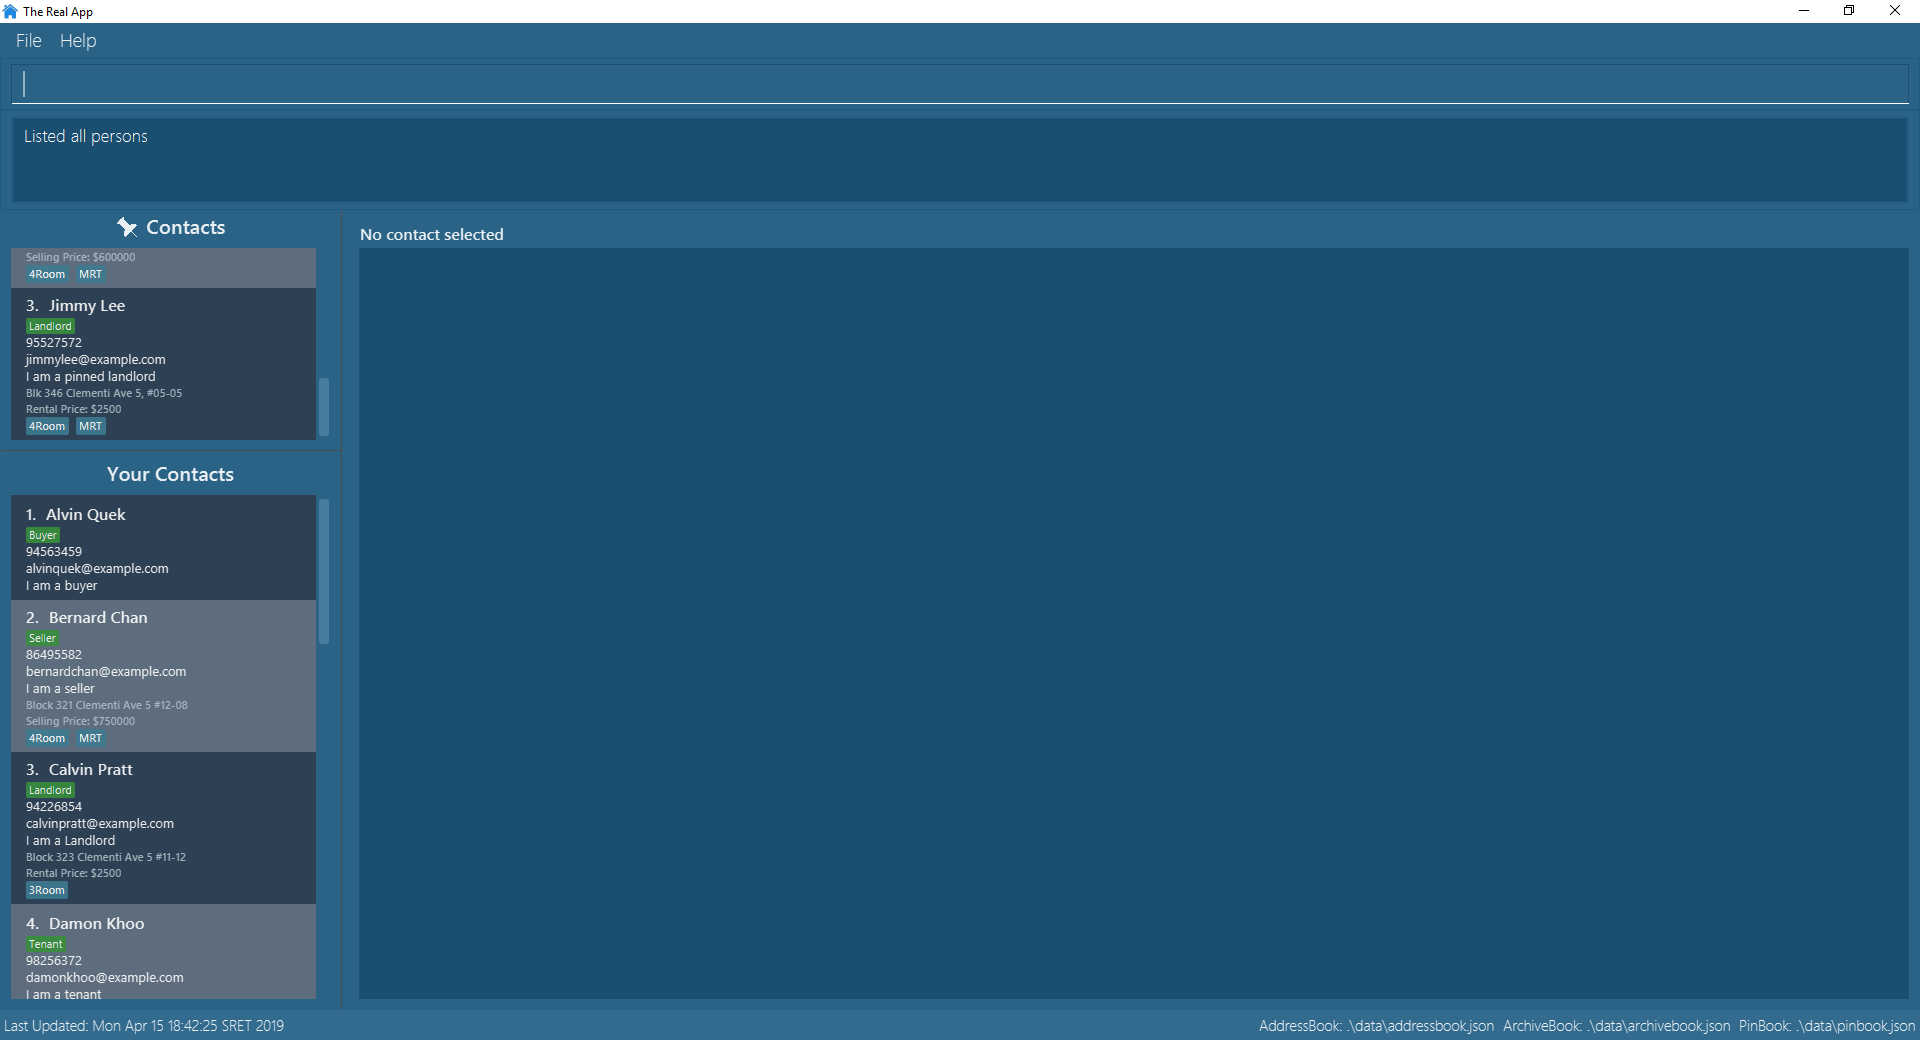
list:

-
Main contact list is displayed:
-
Make sure that the contact at index 2 is a seller, otherwise choose the correct index corresponding to a seller.
Enteredit 2 n/James Li e/jamesli@example.com sp/450000 t/:

-
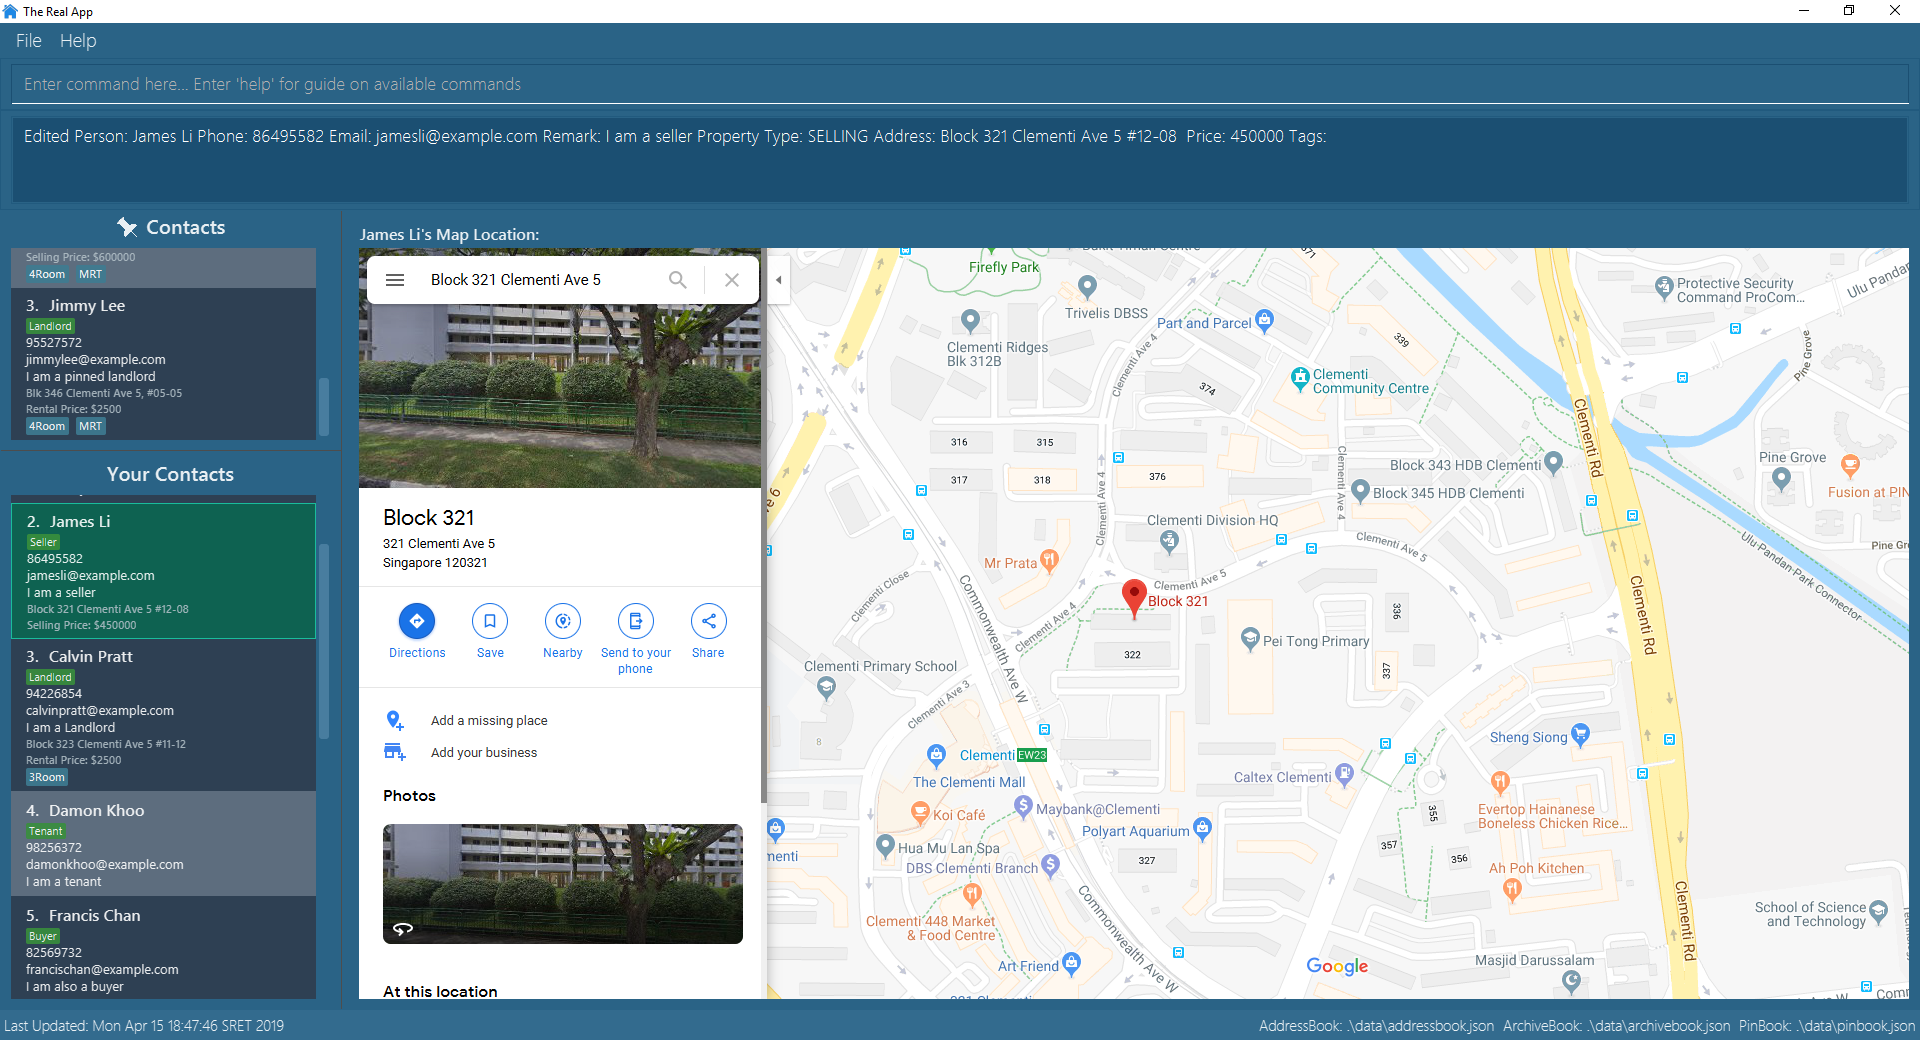
Contact at index 2 is now edited to
James Liand the information are updated accordingly. The contact is also selected upon successful execution of theeditcommand:
3.8. Matching a contact to a property: match [coming in v2.0]
Matches a buyer to a seller’s property or a tenant to a landlord’s property and move both contacts into the archive.
Both buyer and seller, or both tenant and landlord, must be listed prior to matching.
-
Buyer:
Format:match INDEX_BUYER INDEX_SELLER
Example:match 1 8-
Matches the buyer listed as index 1 to the property listed with the seller as index 8, buyer and seller are now archived.
-
-
Tenant:
Format:match INDEX_TENANT INDEX_LANDLORD `
Example: `match 3 10-
Matches the tenant listed as index 3 to the property listed with the landlord as index 10, tenant and landlord are now archived.
-
3.9. Deleting a contact : delete
Deletes the specified contact from the contact book.
Format: delete INDEX
Examples:
-
list
delete 2
Deletes the 2nd contact in the contact book. -
search James
delete 1
Deletes the 1st contact in the results of thesearchcommand. -
search seller
delete 2
Deletes the 2nd contact in the results of thesearchcommand.
3.10. Clearing all entries : clear
Clears all entries from the contact book.
Address book contact list must be displayed prior to clearing.
Format: clear
|
The contact book will be permanently cleared of all contacts and the data will be erased. This can be undone by the |
3.11. Pinning a contact : pin
Pins a contact.
Limited to a maximum of 5 contacts, these contacts will always be showing in a pin list at the top of the side panel.
Format: pin INDEX
|
Pinned contacts must be unpinned before any other commands can be performed, except for |
Examples:
-
list
pin 2
Pins the 2nd contact in the contact book. -
search James
pin 1
Pins the 1st contact in the results of thesearchcommand. -
search seller
pin 2
Selects the 2nd contact in the results of thesearchcommand.
Screenshots for 1st example:
-
Enter
list:

-
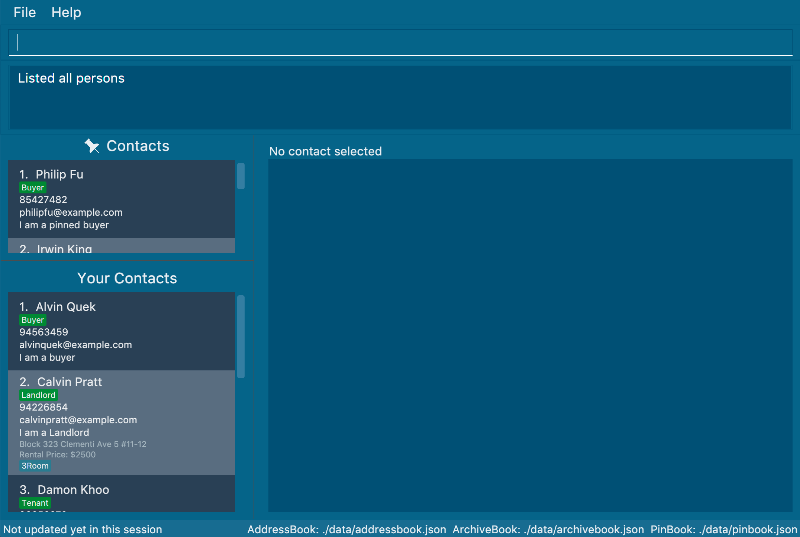
Main contact list is displayed:
-
Enter
pin 2:

-
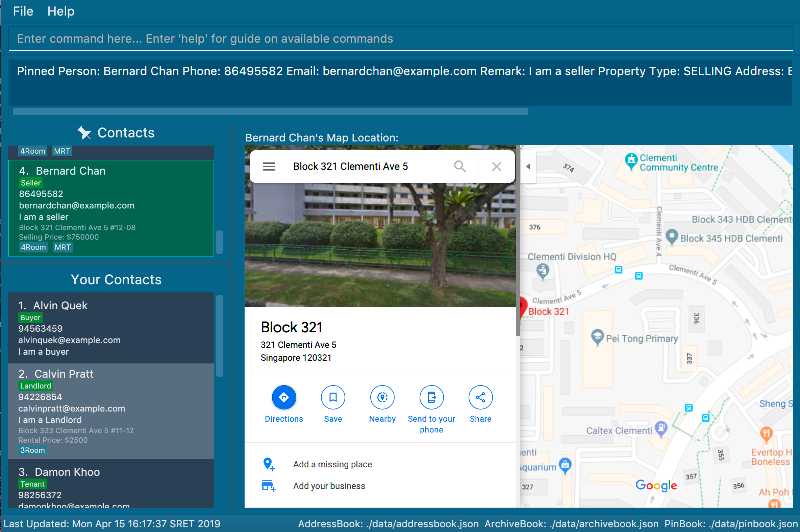
2nd contact has been successfully pinned:
3.12. Unpinning a contact : unpin
Unpins a pinned contact.
Format: unpin INDEX
Example:
-
unpin 1
Unpins the 1st contact in the pin list.
3.13. Selecting a pinned contact : pinselect
Select a pinned contact identified by the index number used in the displayed pin list.
Format: pinselect INDEX
|
Go to Section 3.24, “Displaying location on Google Maps™” for more details on the Google Maps™ display. |
Examples:
-
pinselect 3
Selects the 3rd contact in the pin book.
Screenshots for the example:
-
Enter
pinselect 3:

-
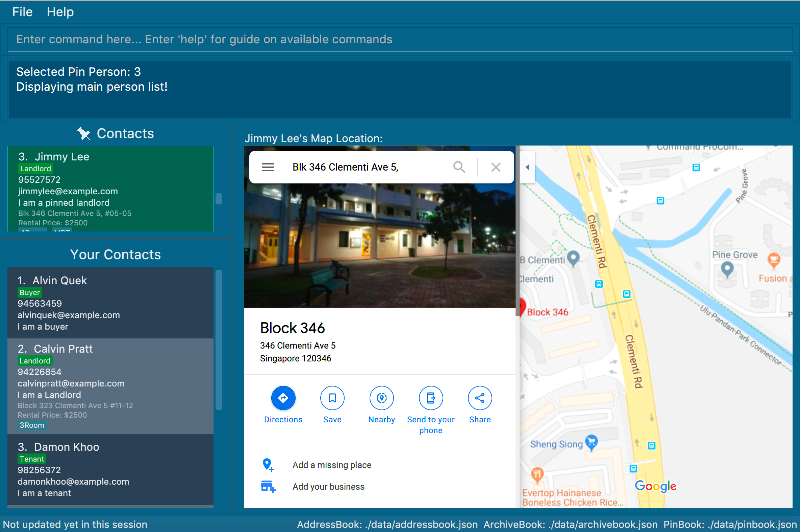
3rd contact in the pin list has been successfully selected:
3.14. Archiving a contact : archive
Moves the specified contact from the main contact book to the archive book.
Archived contacts can only be accessed through the archivelist command.
Format: archive INDEX
|
Archived contacts cannot be pinned, deleted individually or displayed in a sorted list. |
Examples:
-
list
archive 2
Archives the 2nd contact in the contact book. -
search James
archive 1
Archives the 1st contact in the results of thesearchcommand. -
search seller
archive 3
Archives the 3rd contact in the results of thesearchcommand.
Screenshots for 1st example:
-
Enter
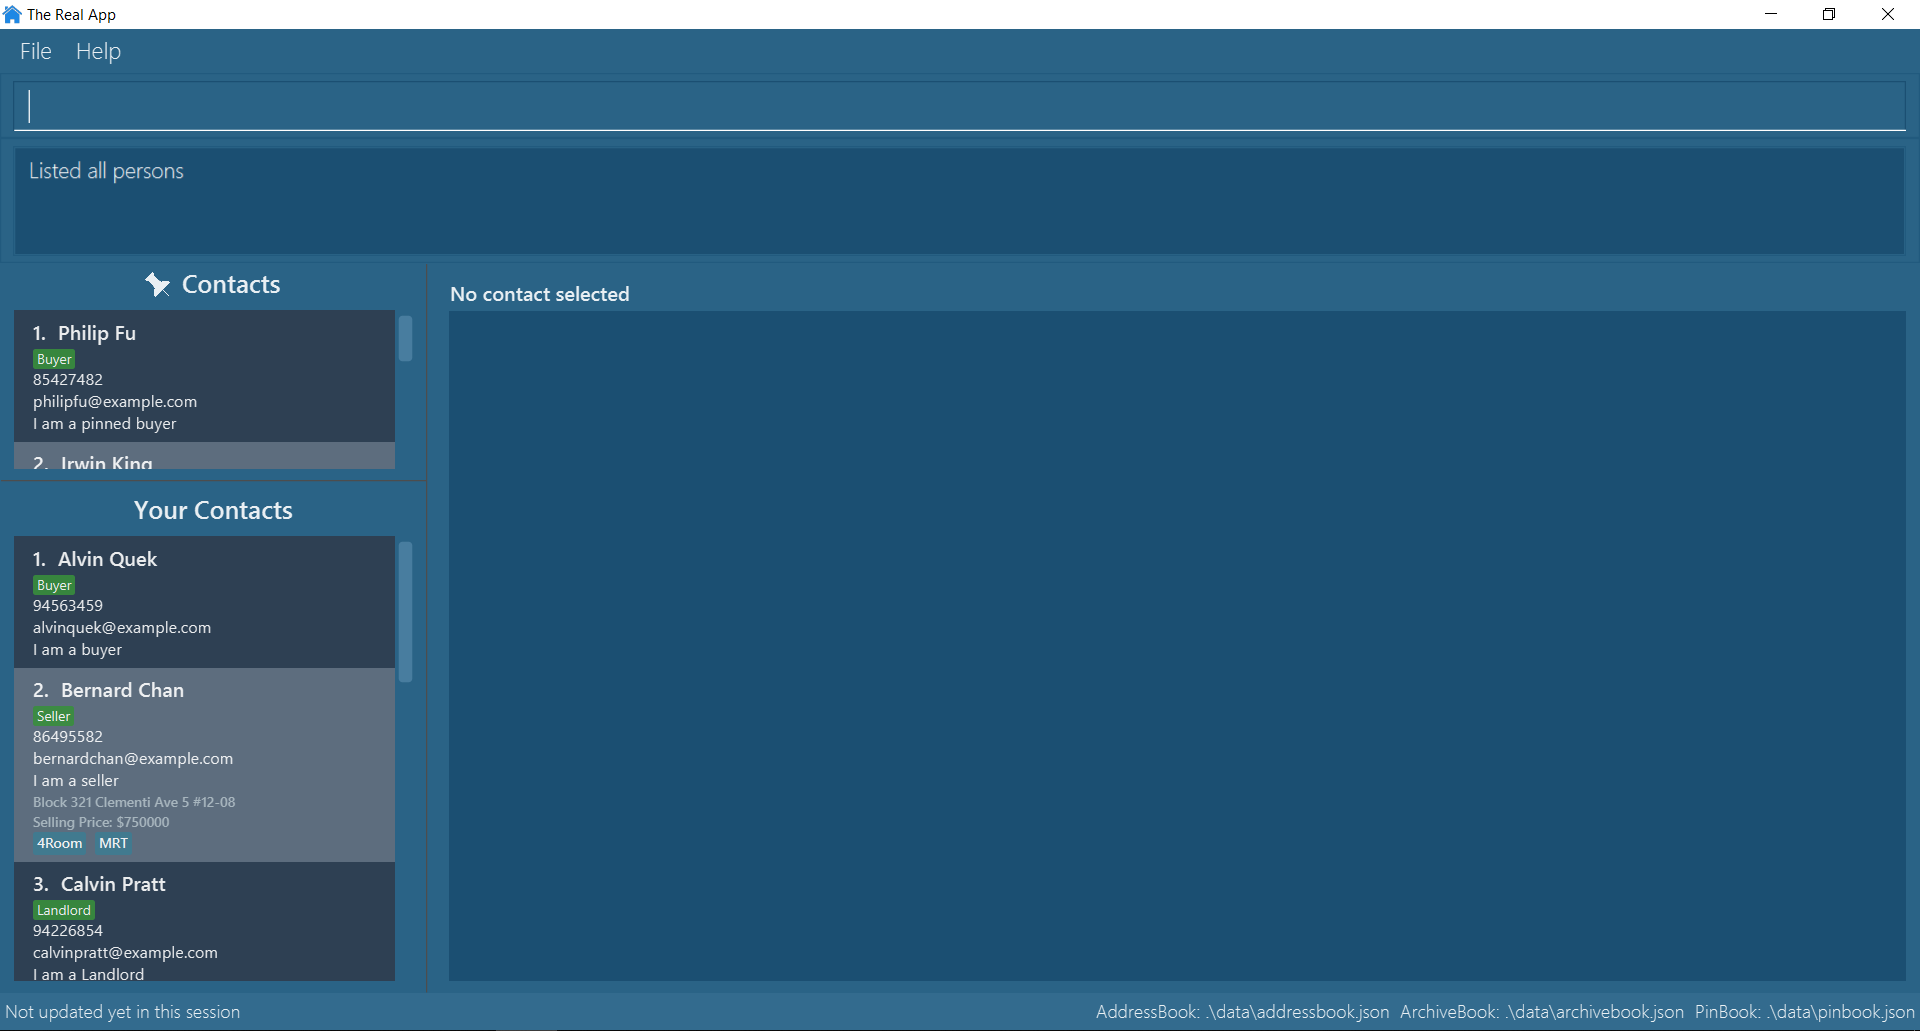
list:

-
Main contact list is successfully displayed:
-
Enter
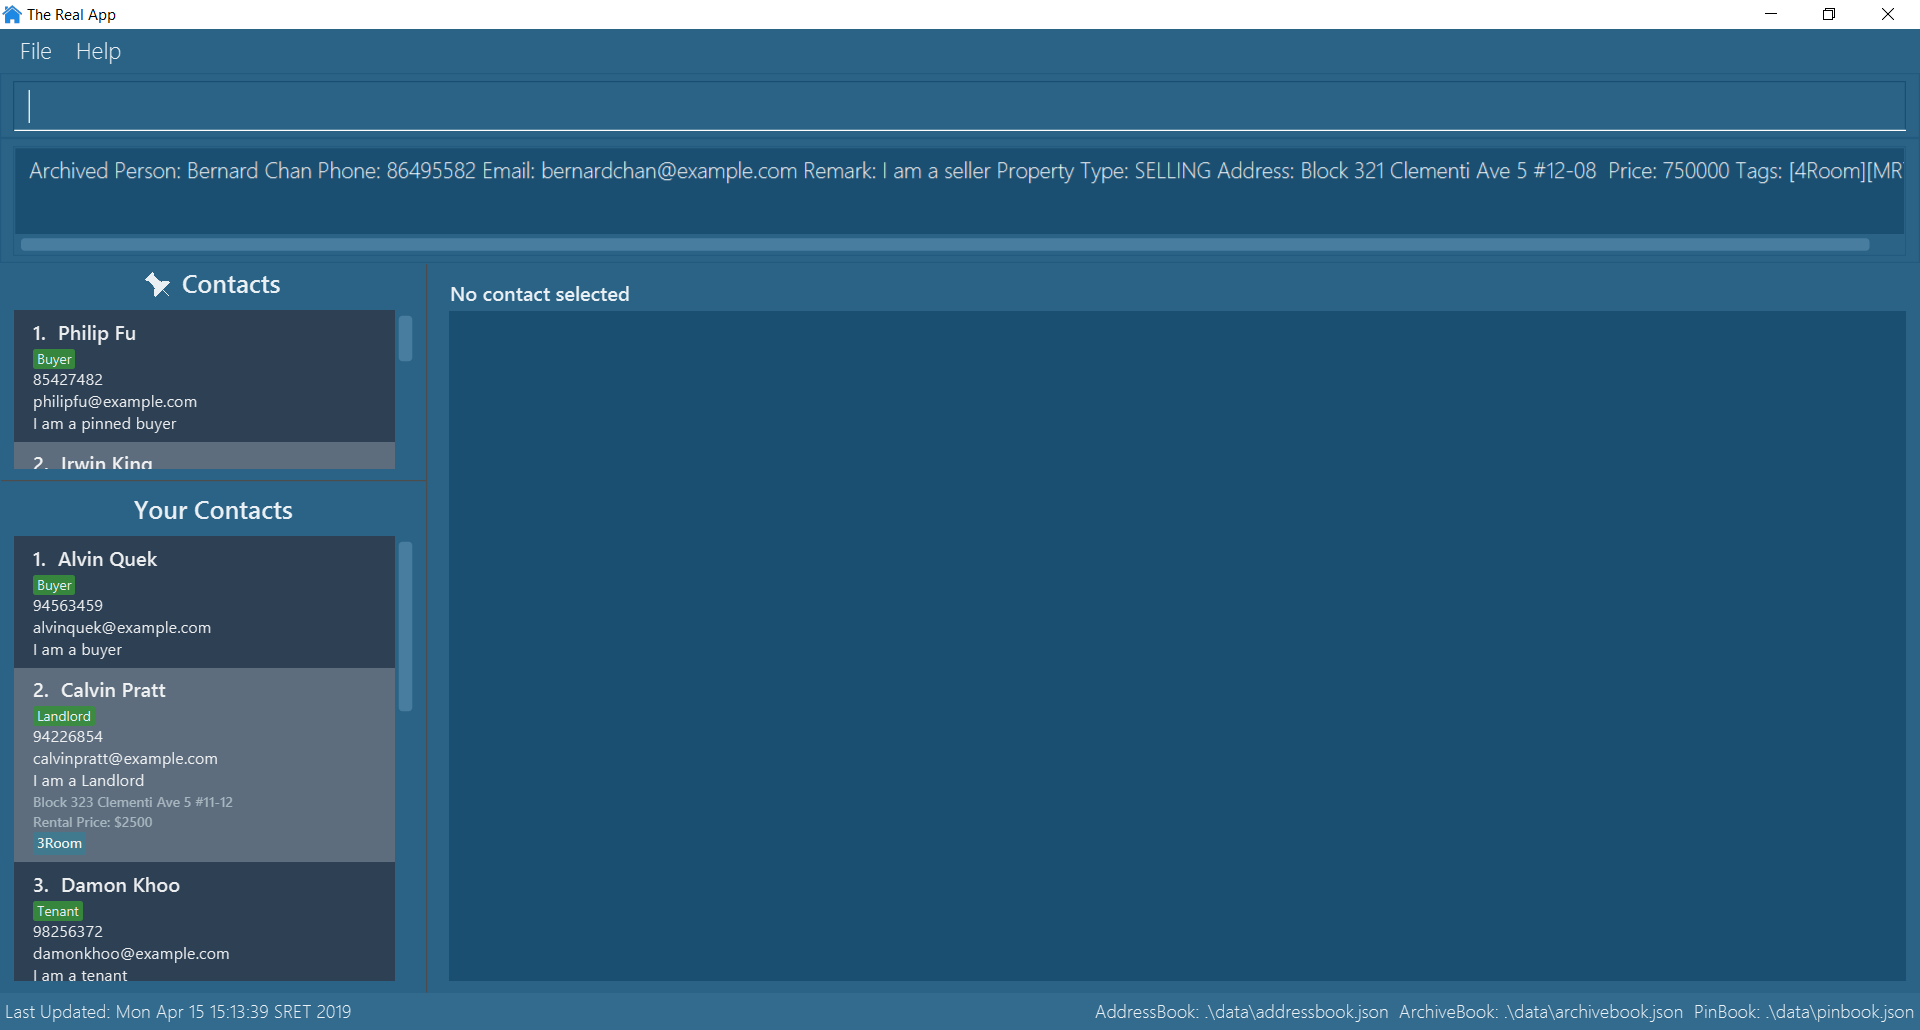
archive 2:

-
The 2nd contact, Bernard Chan, in the main contact list has been successfully archived:
3.15. Listing all archived contacts : archivelist
Lists all the contacts in the archive book, in their archived chronological order.
Format: archivelist
Screenshots (following the 1st example of archive) :
-
Enter
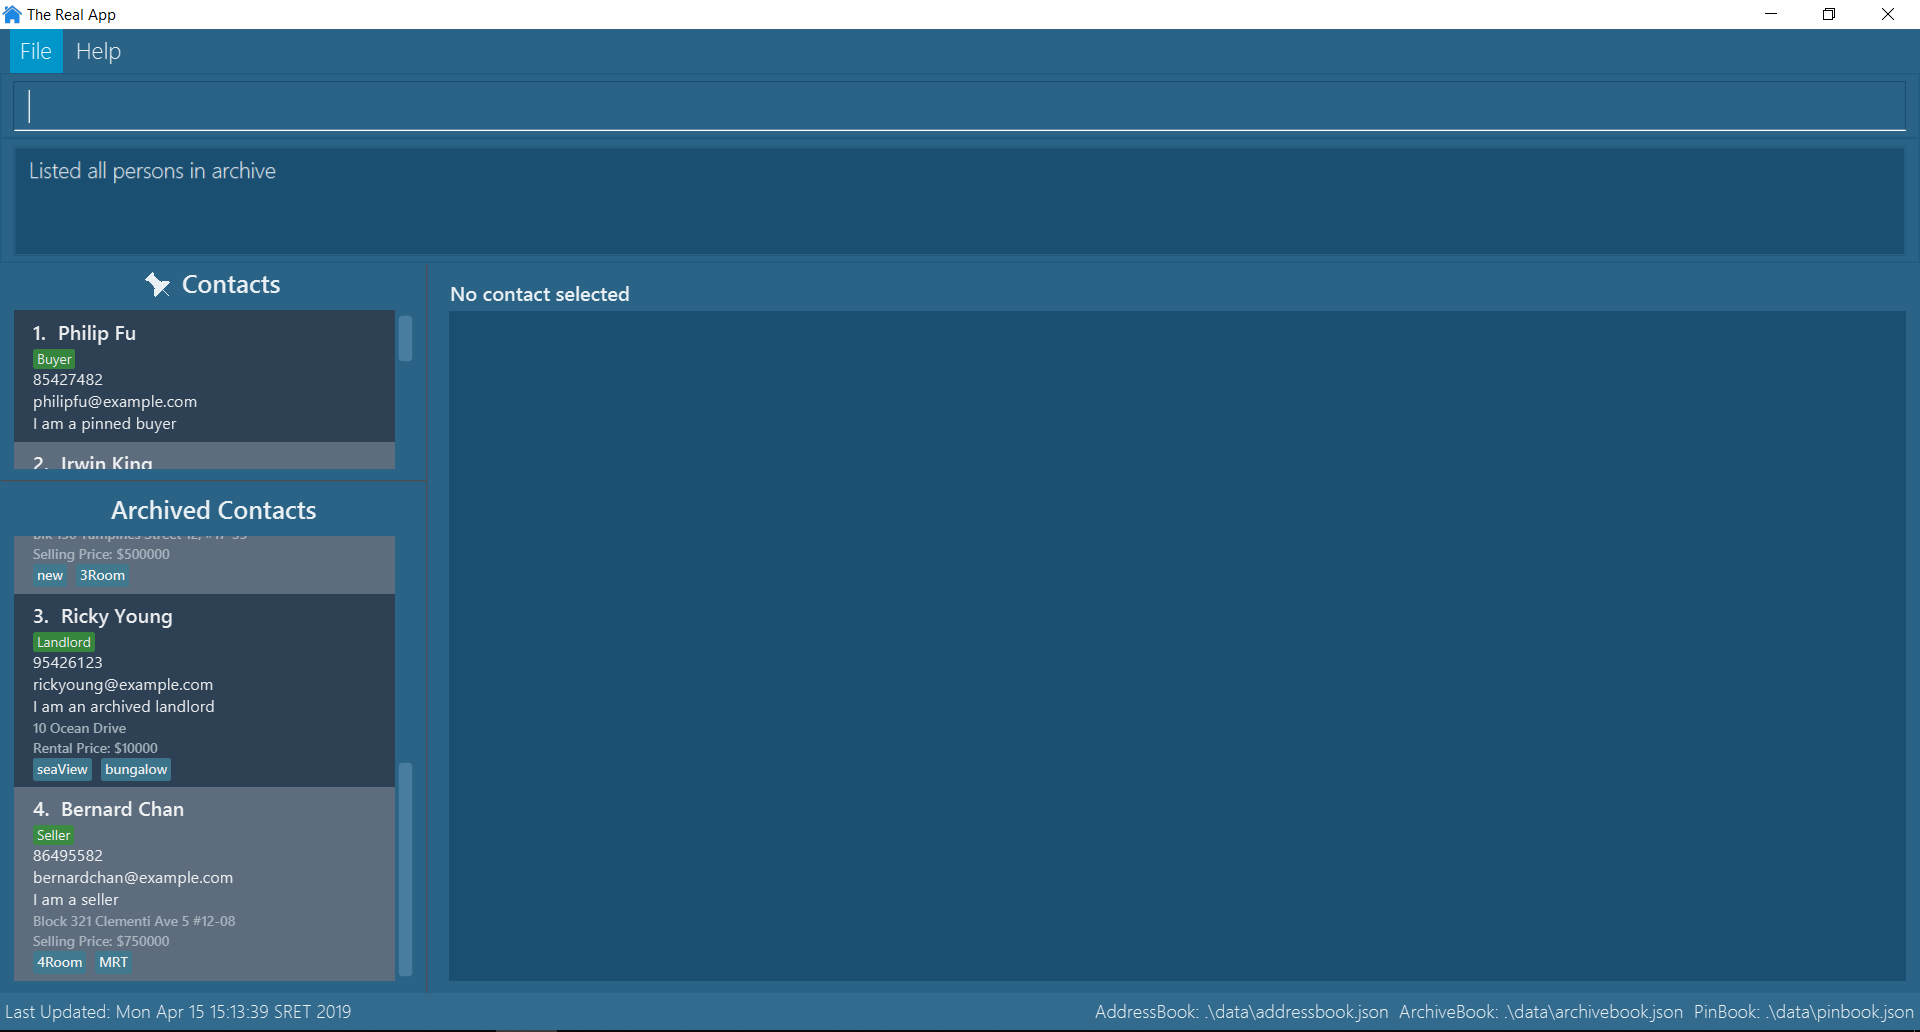
archivelist:

-
The archive list is successfully displayed (and the contact archived, Bernard Chan, can be found!):
3.16. Selecting an archived contact : archiveselect
Selects the archived contact identified by the index number used in the displayed archive list.
Format: archiveselect INDEX
|
Go to Section 3.24, “Displaying location on Google Maps™” for more details on the Google Maps™ display. |
Examples:
-
archivelist
archiveselect 2
Selects the 2nd contact in the archive book.
3.17. Searching for archived contact(s) : archivesearch
Searches the archive and finds contact(s) whose information contains any of the keyword(s).
Format: archivesearch KEYWORD [KEYWORD]…
|
Example:
-
archivesearch James Seller
Returns any contact with information fields matching keywordsJamesand/orSeller
3.18. Unarchiving a contact : unarchive
Moves the specified contact from the archive book back into the main contact book.
Format: unarchive INDEX
Example:
-
archivelist
unarchive 2
Moves the the 2nd contact from the archived contacts list back into the contact book. -
archivesearch James
unarchive 1
Moves the 1st contact in the results of thearchivesearchcommand from the archive back into the contact book.
3.19. Clearing all entries in archive: archiveclear
Clears all entries from the archive book.
Archived contact list must be displayed prior to clearing.
Format: archiveclear
|
The archive book will be permanently cleared of all contacts and the data will be erased. This can be undone by the |
3.20. Listing previously entered commands : history
Lists all the commands that you have entered in reverse chronological order.
Format: history
|
Pressing the ↑ and ↓ arrows will display the previous and next input respectively in the command box. |
3.21. Undoing the previous command : undo
Restores the contact book to the state before the previous undoable command was executed.
Format: undo
|
Examples:
-
delete 1
list
undo(reverses thedelete 1command) -
select 1
list
undo
Theundocommand fails as there are no undoable commands executed previously. -
delete 1
clear
undo(reverses theclearcommand)
undo(reverses thedelete 1command)
3.22. Redoing the previously undone command : redo
Reverses the most recent undo command.
Format: redo
|
Any selection made will be deselected. |
Examples:
-
delete 1
undo(reverses thedelete 1command)
redo(reapplies thedelete 1command) -
delete 1
redo
Theredocommand fails as there are noundocommands executed previously. -
delete 1
clear
undo(reverses theclearcommand)
undo(reverses thedelete 1command)
redo(reapplies thedelete 1command)
redo(reapplies theclearcommand)
3.23. Exiting the app : exit
Exits the app.
Format: exit
3.24. Displaying location on Google Maps™
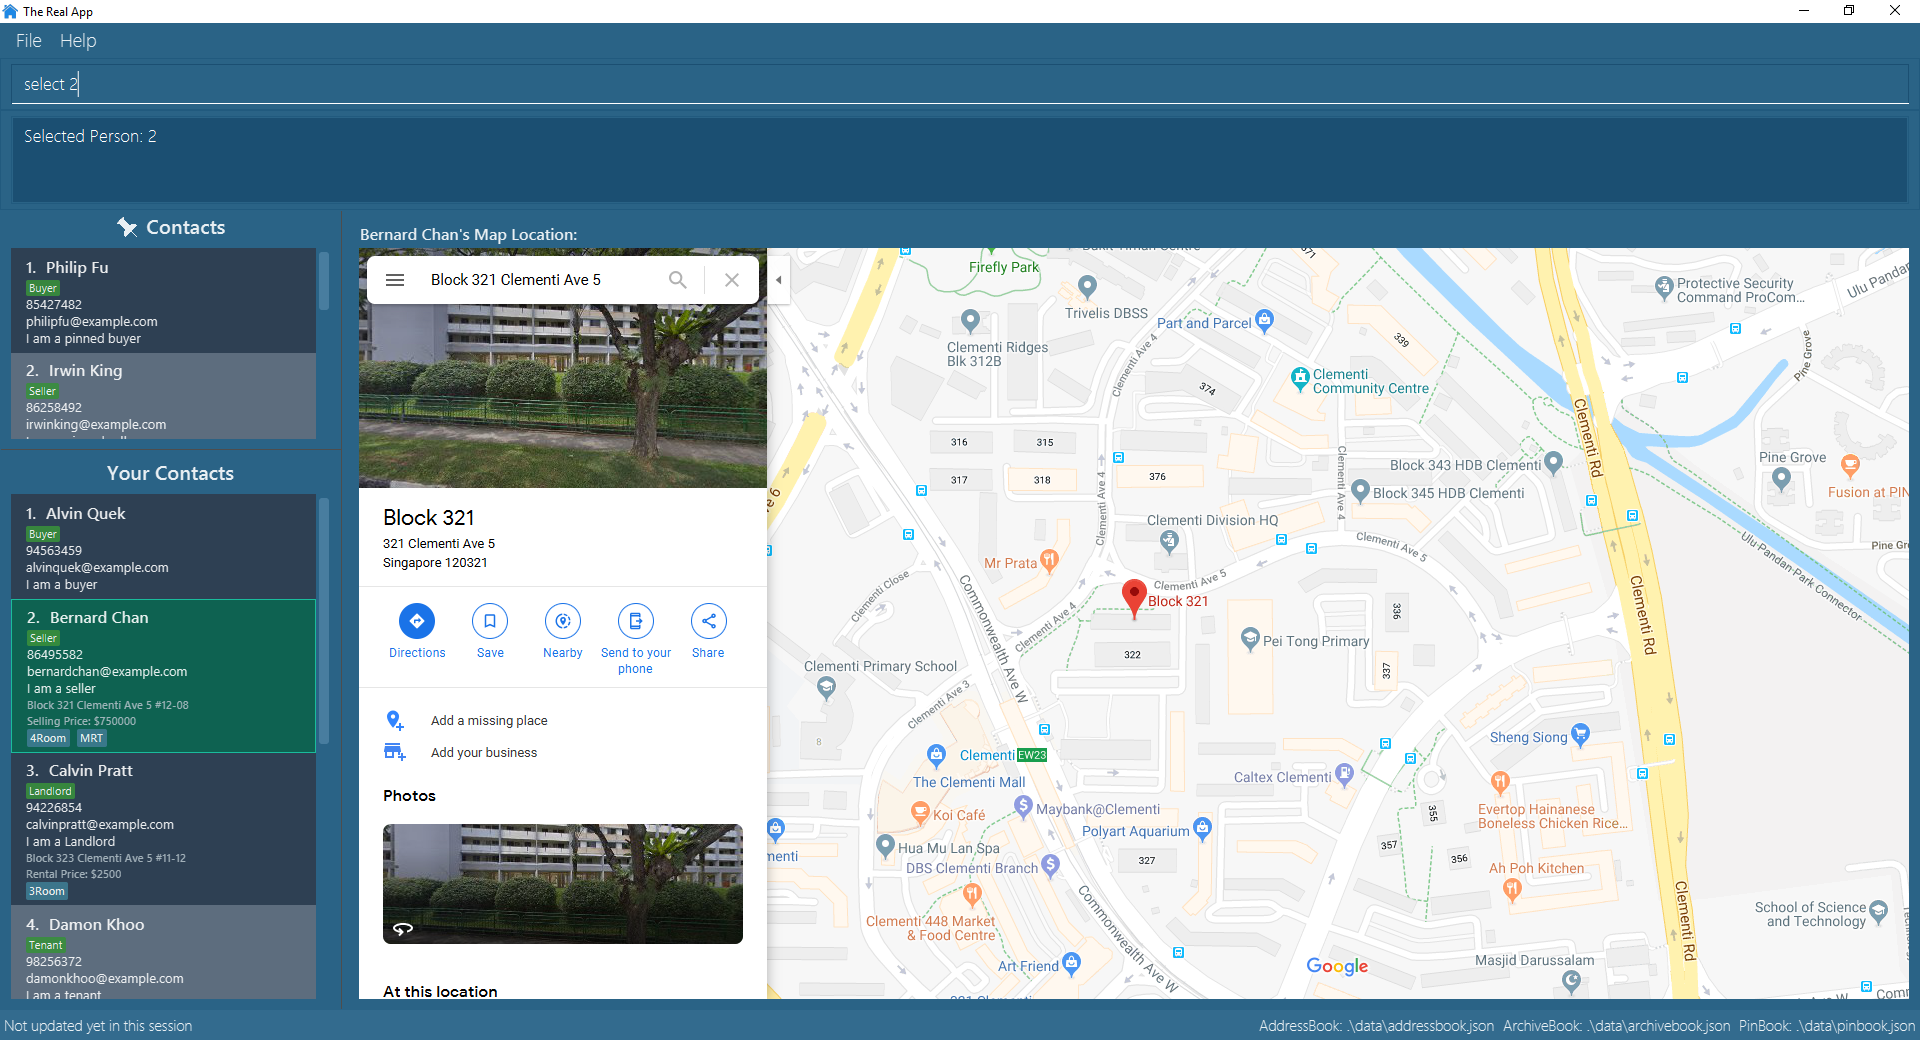
Double-clicking the contact will also select the contact and display the address location of the associated property on the Google Maps™ browser window panel.
|
The screenshot below shows how selecting a contact using any of the select commands will work:
3.25. Saving the data
Address book data are saved in the hard disk automatically after any command that changes the data. There is no need to save manually.
You can find the data saved as data files in .json format in the /data folder created in the home folder of The Real App, after launching the app for the first time.
Go to Section 4, “FAQ” for more details on transferring saved data files.
3.26. Importing and exporting data with .csv files [coming in v2.0]
Contact data in .csv format can be imported into the contact book, as well as exported from the contact book.
3.27. Encrypting data files [coming in v2.0]
The database will be saved in an encrypted format.
3.28. Password-protected login [coming in v2.0]
User can set a password, which will be required when logging into the app.
4. FAQ
Q: How do I transfer my data to another Computer?
A: Install the app in the other computer and overwrite the empty data file it creates with the file that contains the data of your previous The Real App folder.
5. Command Summary
-
Add :
-
Seller:
-
add c/seller n/NAME p/PHONE_NUMBER e/EMAIL r/REMARKS a/ADDRESS sp/SELLING_PRICE_OF_PROPERTY [t/TAG]… -
e.g.
add c/seller n/James Tan p/97652456 e/jamestan@example.com r/need to sell by April 2018 a/Blk 345 Clementi Ave 5, #04-04, S120345 sp/500000 t/MRT t/newlyRenovated
-
-
Buyer:
-
add c/buyer n/NAME p/PHONE_NUMBER e/EMAIL r/REMARK -
e.g.
add c/buyer n/James Ho p/87657252 e/jamesho@example.com r/looking for 3-room apartment
-
-
Landlord:
-
add c/landlord n/NAME p/PHONE_NUMBER e/EMAIL r/REMARKS a/ADDRESS rp/RENTAL_PRICE_OF_PROPERTY [t/TAG]… -
e.g.
add c/landlord n/Hans Tan p/90826522 e/hanstan@example.com r/family friend a/Blk 345 Woodlands Street 32, #04-04, S730345 rp/1500 t/MRT t/newlyRenovated
-
-
Tenant:
-
add c/tenant n/NAME p/PHONE_NUMBER e/EMAIL r/REMARKS -
e.g.
add c/tenant n/Bo Yang p/86541526 e/boyang@example.com r/looking for 4-room apartment
-
-
-
Archive :
archive INDEX-
e.g.
archive 1
-
-
Archive clear :
archiveclear -
Archive list :
archivelist -
Archive search :
archivesearch KEYWORD [KEYWORD]…-
KEYWORDList:CUSTOMER_TYPE,NAME,PHONE_NUMBER,EMAIL,REMARK,ADDRESS,t/TAG -
e.g.
archivesearch james seller
-
-
Archive select :
archiveselect INDEX-
e.g.
archiveselect 2
-
-
Clear :
clear -
Delete :
delete INDEX-
e.g.
delete 3
-
-
Edit :
-
Seller:
-
edit INDEX_SELLER [n/NAME] [p/PHONE_NUMBER] [e/EMAIL] [r/REMARKS] [a/ADDRESS] [sp/SELLING_PRICE_OF_PROPERTY] [t/TAG]… -
e.g.
edit 2 n/James Li e/jamesli@example.com sp/450000 t/
-
-
Buyer:
-
edit INDEX_BUYER [n/NAME] [p/PHONE_NUMBER] [e/EMAIL] [r/REMARKS] -
e.g.
edit 2 n/James Han e/jameshan@example.com r/looking for houses in Woodlands
-
-
Landlord:
-
edit INDEX_LANDLORD [n/NAME] [p/PHONE_NUMBER] [e/EMAIL] [r/REMARKS] [a/ADDRESS] [rp/RENTAL_PRICE_OF_PROPERTY] [t/TAG]… -
e.g.
edit 2 n/Jim Lee p/87654321 rp/1700 t/MRT t/Park
-
-
Tenant:
-
edit INDEX_TENANT [n/NAME] [p/PHONE_NUMBER] [e/EMAIL] [r/REMARKS] -
e.g.
edit 2 n/James p/87654322
-
-
-
Exit :
exit -
Search :
search KEYWORD [KEYWORD]…-
KEYWORDList:CUSTOMER_TYPE,NAME,PHONE_NUMBER,EMAIL,REMARK,ADDRESS,t/TAG -
e.g.
search James Tan yang
-
-
Help :
help -
History :
history -
Match :
-
Buyer:
-
match INDEX_BUYER INDEX_SELLER -
e.g.
match 1 8
-
-
Tenant:
-
match INDEX_TENANT INDEX_LANDLORD -
e.g.
match 3 10
-
-
-
List :
list -
Pin :
pin INDEX-
e.g.
pin 3
-
-
Pin select :
pinselect INDEX-
e.g.
pinselect 2
-
-
Redo :
redo -
Select :
select INDEX-
e.g.
select 2
-
-
Sort :
sort CATEGORY CATEGORY_RESTRICTOR ORDER-
CATEGORYList:n,sp,rp -
CATEGORY_RESTRICTOR:<NAME,>NAME,<SELLING_PRICE,>SELLING_PRICE,<RENTAL_PRICE,>RENTAL_PRICE -
ORDERList:ascending,decreasing -
e.g.
sort sp >500000 ascending
-
-
Unarchive :
unarchive INDEX-
e.g.
unarchive 1
-
-
Undo :
undo -
Unpin :
unpin INDEX-
e.g.
unpin 1
-